
Maven! Cứu tôi khỏi gian nan!
Nói gì thì nói XML vẫn là ngôn ngữ dễ đọc, dễ hiểu, nên việc sử dụng Maven là một lựa chọn tốt cho những anh em là fan của xml trong đó có mình
Apache Maven là một công cụ quản lý mã nguồn cho dự án thông qua file POM. Nó có rất nhiều tính năng hay ho đủ để cho chúng ta sử dụng cho tất cả các loại hình dự án #Java:
- Thiết lập dự án tuân theo tiêu chuẩn, ví dụ: http://maven.apache.org/xsd/maven-4.0.0.xsd
- Quản lý các dependency, tự động download và cấu hình classpath cho chúng ta
- Với các plugin, chúng ta có thể dễ dàng build và deploy dự án của mình
- Chúng ta có thể tự tạo ra các plugin của riêng mình, mà tạo 1 plugin không khó đâu nhé, 🙂
2. Yêu cầu
Trong hướng dẫn này, mình sẽ sử dụng Java 8, nếu bạn vẫn chưa cài Java 8, vui lòng tài và cải đặt nó tại đây
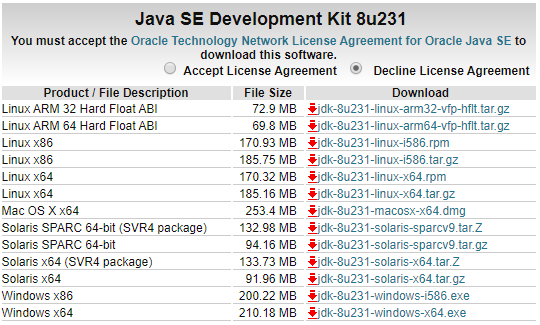
Bạn cần chọn một phiên bản phù hợp với hệ điều hành của mình, ví dụ mình sẽ chọn Windows x64
Ngoài ra bạn nên setup biến môi trường JAVA_HOME, nếu bạn chưa biết cách setup biến môi trường, vui lòng tham khảo bài viết cách tạo biến môi trường
3. Tạo maven project với Eclipse
Nếu bạn chưa có Eclipse, vui long tải và cài đặt phiên bản Eclipse for JavaEE
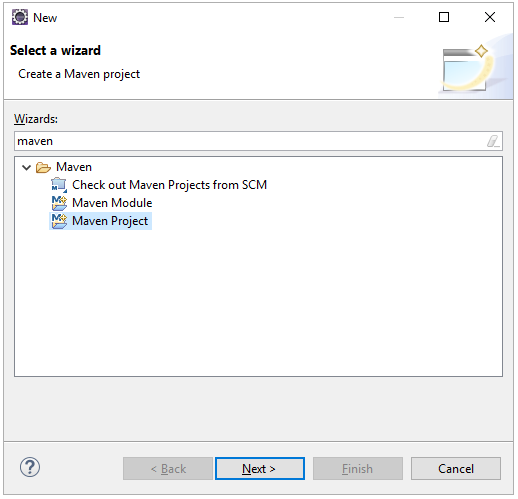
3.1 Mở Eclipse and chọn File->New->Other, bạn có thể gõ “maven” để lọc nhanh hơn và chọn vào Maven Project
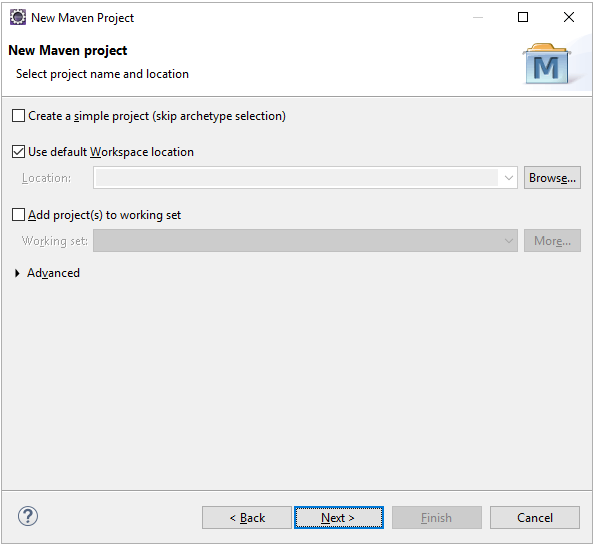
3.2 Click next và chúng ta có
3.3 Click Next và chúng ta có
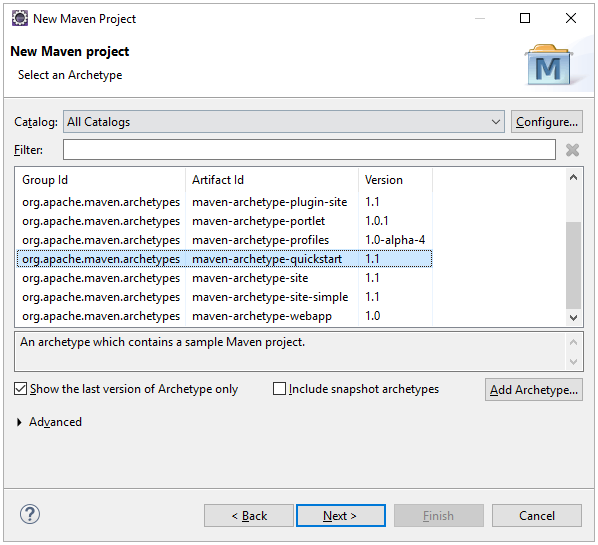
Bước này cho phép chúng ta lựa chọn một archetype (mẫu dự án) mà chúng ta muốn, bạn có thể tìm hiểu thêm về Maven Archetype
Chúng ta sẽ chọn mặc định
3.4 Click next và chúng ta có
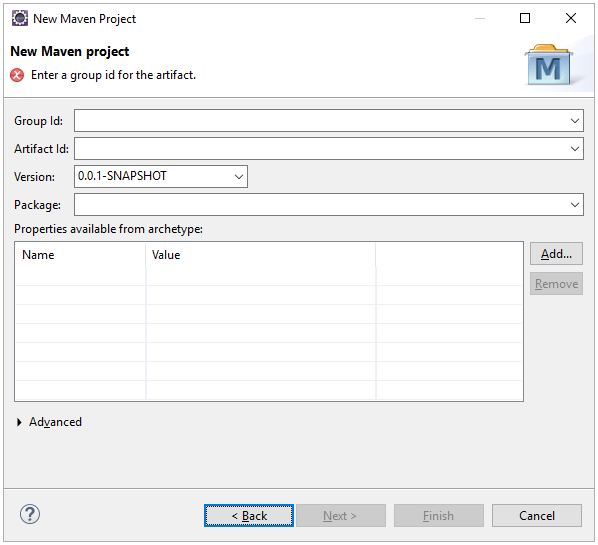
Chúng ta hãy điền các thông tin như sau:
Group Id: com.example
Artifact Id: hello-world
Package: com.example.hello_world
3.5 Click finish và chúng ta có một project tại Eclipse Package Explore như thế này:
4.Create a maven project on Intellij
Nếu bạn chưa có Intellij IDE, vui lòng tải nó tại đây
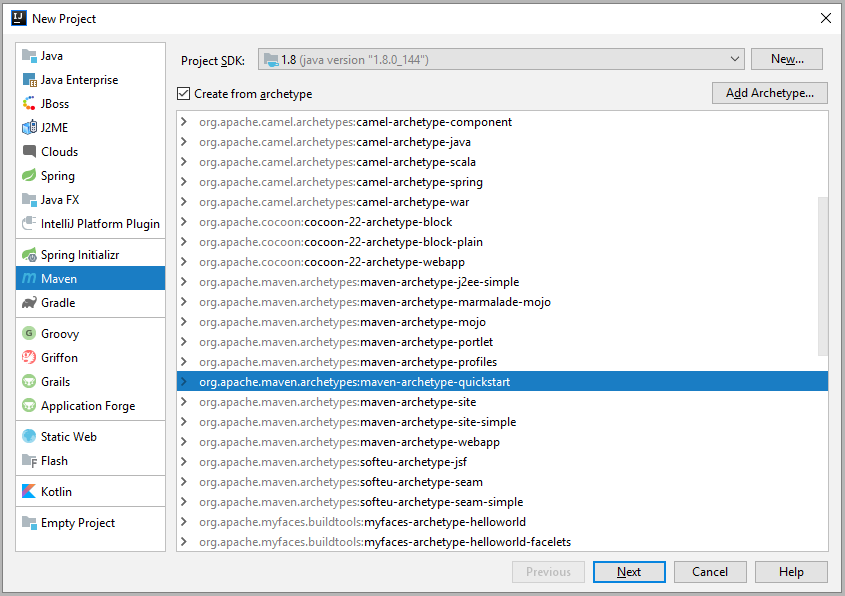
4.1 Mở Intellij IDE và chọn New->Project, chúng ta sẽ có dialog
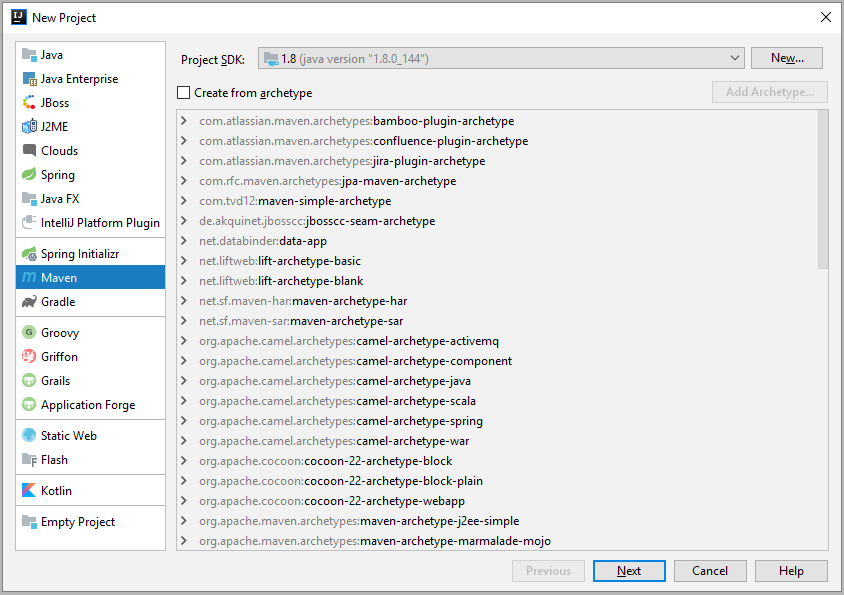
Chọn Maven ở phía bên tay trái dialog, tích vào Create from archetype, tìm và chọn org.apache.maven.archetypes:maven-archetype-quickstart
Bước này cho phép bạn chọn một archetype bạn muốn
4.2 Click next và chúng ta có
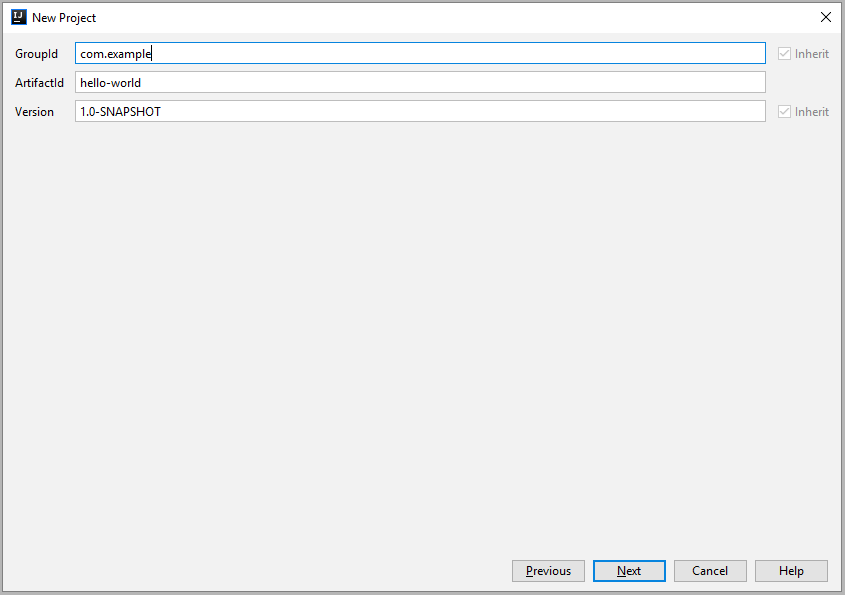
Chúng tay hãy điền các thông tin như sau:
GroupId: com.example
ArtifactId: hello-world
4.3 Click Next, Next (2 lần Next) và chúng ta có
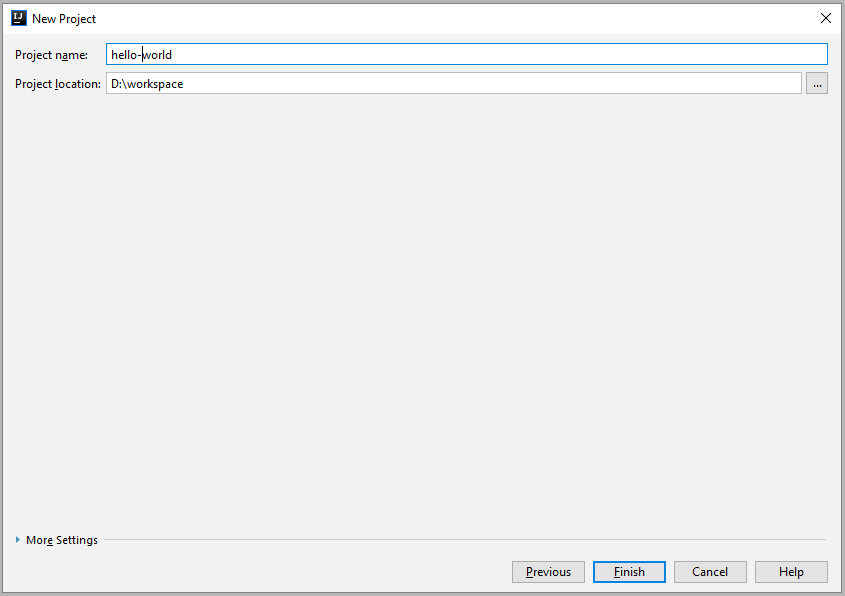
Bạn có thể thay đổi tên project và vị trí project được tạo ra mà bạn muốn
4.4 Click Next (chọn New Window nếu New Project popup bật lên) and chúng ta có
5. Cấu hình maven project
Cấu hình maven cũng tương đối đơn giản, sẽ có 2 phần chính mà chúng ta cần quan tâm, đó là các dependency và các plugin
5.1 Cấu hình file pom.xml
Mở file pom.xml, hiện tại, sau khi tạo xong project chúng ta sẽ có:
<project xmlns="http://maven.apache.org/POM/4.0.0" xmlns:xsi="http://www.w3.org/2001/XMLSchema-instance"
  xsi:schemaLocation="http://maven.apache.org/POM/4.0.0 http://maven.apache.org/xsd/maven-4.0.0.xsd">
  <modelVersion>4.0.0</modelVersion>

  <groupId>com.example</groupId>
  <artifactId>hello-world</artifactId>
  <version>0.0.1-SNAPSHOT</version>
  <packaging>jar</packaging>

  <name>hello-world</name>
  <url>http://maven.apache.org</url>

  <properties>
    <project.build.sourceEncoding>UTF-8</project.build.sourceEncoding>
  </properties>

  <dependencies>
    <dependency>
      <groupId>junit</groupId>
      <artifactId>junit</artifactId>
      <version>3.8.1</version>
      <scope>test</scope>
    </dependency>
  </dependencies>
</project>
Mặc định thì maven sẽ sử dung Java 5, vậy để sử dụng Java 8 chúng ta sẽ cần thay đổi một chút, chún ta sẽ cần thêm 2 properties:
<maven.compiler.source>1.8</maven.compiler.source>
<maven.compiler.target>1.8</maven.compiler.target>
Trong tag <plugins> chúng ta sẽ cần thêm maven=compiler-plugin như thế này:
<plugin>
   <groupId>org.apache.maven.plugins</groupId>
   <artifactId>maven-compiler-plugin</artifactId>
   <version>3.8.1</version>
   <configuration>
      <source>${maven.compiler.source}</source>
      <target>${maven.compiler.target}</target>
   </configuration>
</plugin>
Và bây giờ chúng ta sẽ có file pom.xml:
<project xmlns="http://maven.apache.org/POM/4.0.0"
    xmlns:xsi="http://www.w3.org/2001/XMLSchema-instance"
    xsi:schemaLocation="http://maven.apache.org/POM/4.0.0 http://maven.apache.org/xsd/maven-4.0.0.xsd">
    <modelVersion>4.0.0</modelVersion>

    <groupId>com.example</groupId>
    <artifactId>hello-world</artifactId>
    <version>0.0.1-SNAPSHOT</version>
    <packaging>jar</packaging>

    <name>hello-world</name>
    <url>http://maven.apache.org</url>

    <properties>
        <maven.compiler.source>1.8</maven.compiler.source>
        <maven.compiler.target>1.8</maven.compiler.target>
        <project.build.sourceEncoding>UTF-8</project.build.sourceEncoding>
    </properties>

    <dependencies>
        <dependency>
            <groupId>junit</groupId>
            <artifactId>junit</artifactId>
            <version>3.8.1</version>
            <scope>test</scope>
        </dependency>
    </dependencies>

    <build>
        <plugins>
            <plugin>
                <groupId>org.apache.maven.plugins</groupId>
                <artifactId>maven-compiler-plugin</artifactId>
                <version>3.8.1</version>
                <configuration>
                    <source>${maven.compiler.source}</source>
                    <target>${maven.compiler.target}</target>
                </configuration>
            </plugin>
        </plugins>
    </build>
</project>
Trên Eclipse, bạn sẽ phải click chuột phải vào project và chọn Maven->Update Project hoặc ấn Alt+F5. Trên Intellij bạn sẽ cần chọn chuột phải vào project và chọn Maven->Re-import và bây giờ chúng ta sẽ có hello-world project với Java 8
5.2 Cấu hình unitest dependency
Junit phiên bản 3.8 đã quá cũ, chúng ta có thể dùng TestNG và jacoco để kiểm tra coding coverage. Chúng ta sẽ thay thế junit với test-util như thế này:
<dependency>
        <groupId>com.tvd12</groupId>
        <artifactId>test-util</artifactId>
        <version>1.0.5</version>
</dependency>
Thêm jacoco plugin nữa:
<plugin>
        <groupId>org.jacoco</groupId>
        <artifactId>jacoco-maven-plugin</artifactId>
        <version>0.8.4</version>
        <executions>
            <execution>
                <id>prepare-agent</id>
                <goals>
                    <goal>prepare-agent</goal>
                    </goals>
                </execution>
            <execution>
            <id>default-report</id>
            <phase>prepare-package</phase>
            <goals>
                <goal>report</goal>
            </goals>
            </execution>
        </executions>
</plugin>
Và bây giờ chúng ta sẽ có một file pom.xml hoàn chỉnh:
<project xmlns="http://maven.apache.org/POM/4.0.0"
    xmlns:xsi="http://www.w3.org/2001/XMLSchema-instance"
    xsi:schemaLocation="http://maven.apache.org/POM/4.0.0 http://maven.apache.org/xsd/maven-4.0.0.xsd">
    <modelVersion>4.0.0</modelVersion>

    <groupId>com.example</groupId>
    <artifactId>hello-world</artifactId>
    <version>0.0.1-SNAPSHOT</version>
    <packaging>jar</packaging>

    <name>hello-world</name>
    <url>http://maven.apache.org</url>

    <properties>
        <maven.compiler.source>1.8</maven.compiler.source>
        <maven.compiler.target>1.8</maven.compiler.target>
        <project.build.sourceEncoding>UTF-8</project.build.sourceEncoding>
    </properties>

    <dependencies>
        <dependency>
            <groupId>com.tvd12</groupId>
            <artifactId>test-util</artifactId>
            <version>1.0.5</version>
            <scope>test</scope>
        </dependency>
    </dependencies>

    <build>
        <plugins>
            <plugin>
                <groupId>org.apache.maven.plugins</groupId>
                <artifactId>maven-compiler-plugin</artifactId>
                <version>3.8.1</version>
                <configuration>
                    <source>${maven.compiler.source}</source>
                    <target>${maven.compiler.target}</target>
                </configuration>
            </plugin>
            <plugin>
                <groupId>org.jacoco</groupId>
                <artifactId>jacoco-maven-plugin</artifactId>
                <version>0.8.4</version>
                <executions>
                    <execution>
                        <id>prepare-agent</id>
                        <goals>
                            <goal>prepare-agent</goal>
                        </goals>
                    </execution>
                    <execution>
                        <id>default-report</id>
                        <phase>prepare-package</phase>
                        <goals>
                            <goal>report</goal>
                        </goals>
                    </execution>
                </executions>
            </plugin>
        </plugins>
        <pluginManagement>
            <plugins>
                <plugin>
                    <groupId>org.apache.maven.plugins</groupId>
                    <artifactId>maven-surefire-plugin</artifactId>
                    <version>2.22.2</version>
                    <configuration>
                        <suiteXmlFiles>
                            <suiteXmlFile>src/test/resources/AllTests.tng.xml</suiteXmlFile>
                        </suiteXmlFiles>
                    </configuration>
                </plugin>
            </plugins>
        </pluginManagement>
    </build>
</project>
Khi build project chúng ta sẽ bị lỗi ở file AppTest.java. Nhưng đừng lo lắng, hãy thay đổi nội dung của file đó thành:
package com.example.hello_world;

import org.testng.annotations.Test;

public class AppTest {

    @Test
    public void test() {
        System.out.println("I'm a test");
    }
}
Để build được project chúng ta sẽ cần tạo file AllTest.tng.xml trong thư mục src/test/resources với nội dung:
<!DOCTYPE suite SYSTEM "http://testng.org/testng-1.0.dtd">
<suite name="AllTests">
<test name="All">
<packages>
<package name="com.example.hello_world"></package>
</packages>
</test>
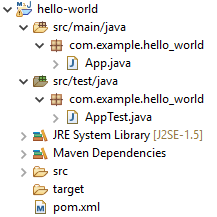
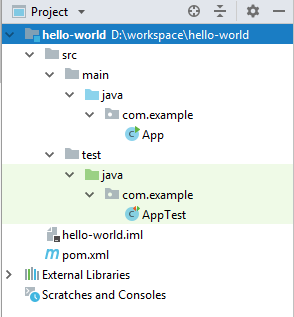
</suite>Cuối cùng, chúng ta sẽ có project hello-world với cấu trúc:
Build project với goals: clean install. Và chúc mừng, chúng ta đã hoàn thành.
6.Tổng kết
Sử dụng maven để quản lý các dự án Java là một lựa chọn tốt. Chúng ta không cần quan tâm đến việc phải import thư viện nữa, maven sẽ tự làm cho chúng ta. Chúng ta không cần phải lo lắng về việc quản lý phiên bản build nữa, Maven sẽ giúp chúng ta.